Custom Magento Themes are unique templates designed and developed specifically for a certain eCommerce store, based on the store’s unique business needs, brand identity, and user experience goals.
You can follow these steps or take Magento Design Service
Table of Contents
ToggleThere are only 7 Steps To Creating Custom Magento Themes
These 7 steps will provide the basic framework to create a custom Magento theme from scratch.
Stape 1 – Create A Directory For Your Theme
To create a custom Magento theme, create a directory containing all necessary files and assets.
Ensure the directory follows this structure: “vendor_name/theme_name” and nest it within the “app/design/frontend” directory of your Magento installation.
Take the example of “Adam” as your vendor name and “MyTheme” as your theme name. In this case, you would create a directory named “Adam/MyTheme” in the “app/design/frontend” directory.
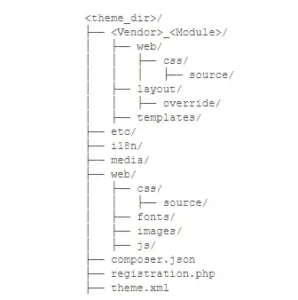
Inside this directory, you’ll organize subdirectories such as “web,” “templates,” “layout,” and more. be used to store your theme’s assets, templates, layout files, and additional configuration files.

Typical look of a Magento theme directory [Source: devdocs.Magento]
Step 2 – Declare Your Theme In The Directory
Once the directory is created for the custom theme, next step is to declare it in the directory by adding a theme.xml file.
Within this file, you’ll include details about your theme, like its name, parent theme (if applicable), and any other relevant information.
The theme.xml file should be placed in the root directory of your theme.
Step 3 – Convert Your Theme Into A Composer Package
Subsequently, you’ll convert your custom theme into a Composer package. This process facilitates efficient management of your theme’s dependencies and simplifies distribution and installation procedures.
To accomplish this task, you’ll create a composer.json file in the root directory of your theme.

Theme locations, names and types for the composer.json file
Step 4 – Register Your Custom Theme By Adding A Registration.php File
Once your theme is converted into a Composer package, you can register your custom theme by adding a Registration.php file.
This file will register your theme with Magento and tell it where to find your theme’s files. The Registration.php file should be located in the app/design/frontend/[Vendor]/[Theme]/ directory.

Registration.php file process for adding a theme
[Source: devdocs.magento]
Stape 5. Apply & Configure Your Custom Theme In The Magento Admin
After successfully registering your custom theme with Magento, you can proceed to apply and configure it within the Magento Admin panel.
To initiate this process, navigate to Content > Design > Configuration, then select the Edit button next to the store view where you wish to apply your theme.
From there, you can choose your custom theme from the Applied Theme dropdown menu.
Stape 6. Use LESS To Make Changes To Your Theme’s Styles
LESS stands out as a popular CSS preprocessor utilized for refining your theme’s styles. Its capabilities include leveraging variables, mixins, and other advanced CSS functionalities, thereby enhancing the efficiency and reusability of your styling efforts.
To integrate LESS into your custom Magento theme, you’ll create a custom.less file within the directory path: app/design/frontend/[Vendor]/[Theme]/web/css/source/. Afterwards, you’ll include it in your theme’s default_head_blocks.xml file.
Stape 7. Incorporate Basic Layout Elements Into Your Custom Theme
The concluding step in crafting a custom Magento theme involves integrating fundamental layout elements into your theme.
This encompasses elements such as the header and footer, which are common elements found on every page of your website.
To accomplish this, you’ll generate templates for these elements and incorporate them into your theme’s default.xml file.
Custom Magento Themes Pros and Cons:
Pros:
- Uniqueness: Custom themes provide a unique look and feel that reflects your brand, helping you stand out in a crowded market
- Functionality: Custom themes can be tailored to the specific needs of your online store, including custom features and integrations
- Performance: Custom themes can be optimized for your store’s specific needs, resulting in faster page load times and improved user experience
- Flexibility: Custom themes can be updated and modified as your store evolves and grows
- SEO-friendly: Custom themes can be designed with SEO in mind, ensuring better rankings and even getting ahead among competitors
- Full control: Custom themes give you full control over the site’s look and functionality, allowing you to make changes and control the visual feel of your website
Cons:
- Higher cost: Custom themes require more time and resources to develop, resulting in a higher upfront cost compared to pre-made themes
- Longer development time: Custom themes can take longer to develop than pre-made themes, which may delay the launch of your store
- Dependency on developers: Custom themes require a skilled developer to maintain and update, which can be costly and time-consuming
- Limited compatibility: Custom themes may not be compatible with future updates of the Magento platform, requiring additional development work
- Risk of poor quality: Custom themes developed by inexperienced developers may have bugs, security vulnerabilities, or poor coding practices


